Learn How to Change a Film in a Camera
Whether you're a photography enthusiast or someone looking to explore the world of film photography, understanding the process of changing film in a camera is essential. Capturing moments on film can create a sense of nostalgia and a unique aesthetic. In this step-by-step guide, we will take you through the process of changing film in a film camera, ensuring that you can load your roll of film correctly and capture stunning images. So, let's dive in and learn the art of film photography!
Understanding the Importance of Correct Film Loading
When it comes to film photography, the roll of film is the heart of the camera. It requires proper handling and loading to ensure the best results. The film canister, containing the roll of film, plays a crucial role in preserving the light-sensitive emulsion on the film. Additionally, understanding the concept of film speed, also known as ISO, is vital for achieving the desired photographic effect. Proper film loading sets the foundation for a seamless photography experience, allowing you to capture each moment with precision.
The impact of incorrect film loading
Incorrect film loading can have a significant impact on the quality of your photographs. When the film is not properly placed in the camera, sprocket holes can get damaged, resulting in overlapping or skipped frames. This can be frustrating, as you might end up with a whole roll of film that doesn't capture the moments as intended. Moreover, poor film loading can lead to light leaks, where unwanted light enters the camera, causing exposure issues and potentially ruining the entire roll of film. To avoid these challenges, understanding the correct film loading process is essential.
Problems associated with poor film handling
In addition to film loading, proper film handling is crucial for preserving the integrity of your film. Mishandling the film canister, for example, by exposing it to bright light for an extended period, can lead to film fogging and decreased image clarity. The rewind knob, located on the top of the camera, which allows you to rewind the film back into the canister, should be operated carefully to avoid damaging the film inside. Poor film handling can result in light leaks, scratches, and other issues that can significantly impact the final outcome of your photographs. By taking the time to handle your film properly, you can avoid unnecessary problems and ensure the best possible results.

Preparing for Film Change
Before diving into the actual film change process, it's essential to prepare appropriately. Consider the film speed, also known as ISO, or film ISO, based on the lighting conditions you anticipate shooting in. Similar to a digital camera’s ISO, the film ISO refers to how light-sensitive the film is. Different film speeds are suitable for various lighting scenarios, so choose the right film speed for your intended subject. Additionally, ensure that you have a clean and dust-free roll of film, ready for loading into the camera. By preparing these essential materials, you can set the stage for a successful film change experience.
Choosing the right film
When it comes to film photography, selecting the right film is crucial. Here are some important factors to consider when choosing the right film:
- Film speed, also known as ISO, determines the film's sensitivity to light. Higher ISO films are best suited for low-light conditions, while lower ISO films are ideal for well-lit environments.
- Consider the lighting conditions you anticipate shooting in. For bright outdoor environments, ISO 100 or 200 films are suitable, while ISO 400 films are versatile and can handle a range of lighting conditions.
- Think about the desired outcome of your photos. Different films have unique characteristics, such as colour saturation, grain, and contrast, which can significantly impact the overall look and feel of your images.
- Experiment with different film brands and types to find the ones that resonate with your creative vision.
Necessary materials for film change
To ensure a smooth film change process, it's essential to have the necessary materials readily available. Here are some items you'll need:
- A clean and dust-free film canister opener allows you to safely extract the roll of film from the canister.
- A film leader retriever helps you retrieve the film leader, the part of the film that you will load into the camera first.
- Consider using film handling gloves and lint-free wipes to prevent fingerprints, dust, and debris from affecting the film quality.
- Keep your lens cap on during the film change process to avoid exposing the film to any unintentional light.
- Having these essential materials at hand will make the film change process seamless and hassle-free.

Steps to Open the Back of Your Camera
Before loading the film, you'll need to open the back of your camera. While the specific steps may vary depending on the camera model, the general process remains the same. Here's a basic guide to opening the back of your camera:
- Locate the back of the camera, typically secured by a silver button or latch.
- Press the film release button, often found on the bottom of the camera, to release any film tension.
- With your right thumb or hand, gently slide the back door open, revealing the film compartment.
- Following these steps will allow you to access the film compartment, where you can load the film securely.
Safety precautions before opening
Before opening the back of your camera, it's essential to take some safety precautions:
- Ensure that the lens cap is on to prevent any accidental exposure of the film to light.
- Find a safe, light-free environment to minimise the risk of light leaks and unwanted exposure.
- Check the position of the film rewind knob, ensuring that it is fully lowered, to avoid film damage when opening the back door.
- Using your right hand, gently hold the camera and support it as you open the back door. This will prevent any accidental drops or mishandling that could damage the film or the camera.
Techniques for easy camera opening
Opening the back of your camera can sometimes be challenging, especially if you're doing it for the first time. To make the process easier, try the following techniques:
- Position the camera with the left side facing up, allowing the back door to swing open toward the right hand side, like a book.
- Hold the camera securely with your right hand, ensuring a firm grip.
- Use your left hand to gently open the back door, exerting light pressure as needed.
- Following these techniques will help you open the back of your camera smoothly, without any unnecessary difficulties.

Loading the Film into Your Camera
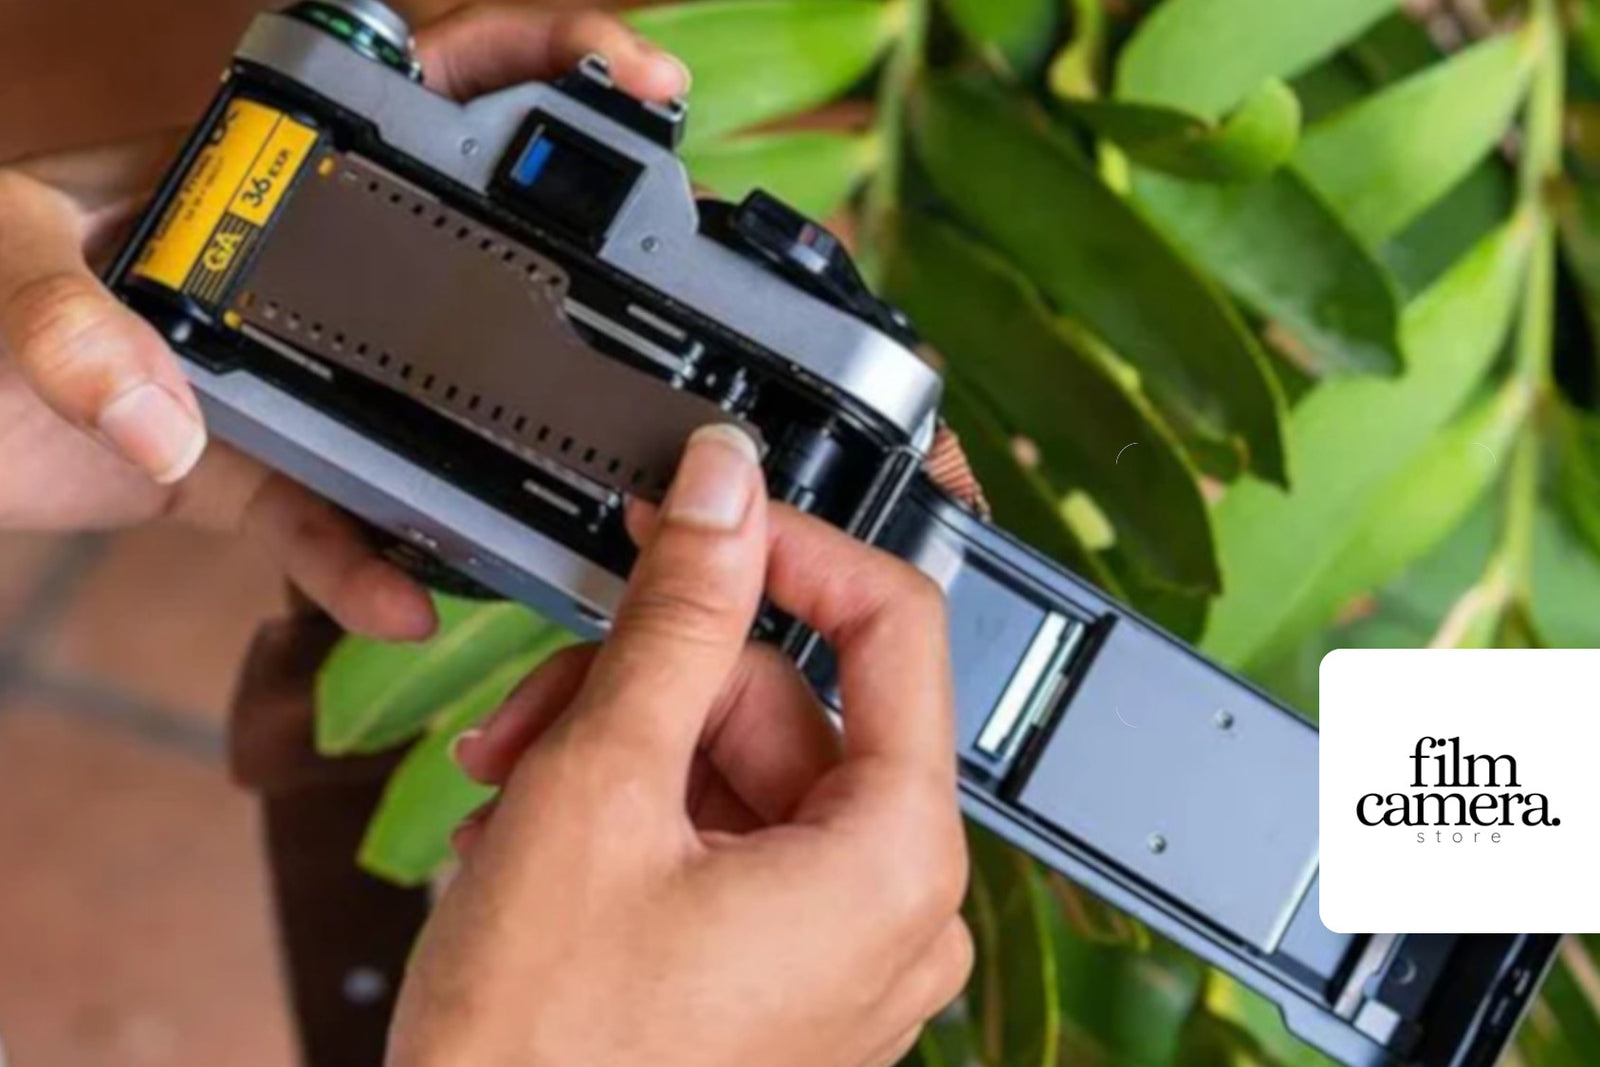
Now that you have successfully opened the back of your camera, it's time to load the roll of film. Loading film may vary slightly depending on the camera model, so always refer to the camera manual for specific instructions. Here's a general step-by-step process for loading film into your analog camera:
- Take the roll of film, also known as the film canister, and carefully insert it into the slot provided.
- Ensure that the film engages with the camera's sprocket holes, which allow the film to advance with each shot.
- Look for the film leader, the narrow, unexposed end of the film, and thread it through the designated film path, following the camera's guidelines.
- Gently close the camera back door, ensuring it is securely latched to avoid light leaks.
Step-by-step film loading process
To load the film accurately, follow these step-by-step instructions:
- Take the roll of film, known as the film canister, in your hand, being careful not to touch the light-sensitive surface.
- Locate the slot in the camera where the film will be inserted. The slot may vary in location and size, depending on the camera model.
- Align the film canister with the slot, ensuring the notched side of the canister matches the slot's configuration.
- Insert the film canister into the slot, taking care not to force it. The canister should slide in smoothly, allowing the film to be threaded correctly.
- Look for the film leader, the narrow, unexposed end of the film, protruding from the canister. Gently pull the film leader out of the canister, stopping when there is enough film to be securely loaded into the camera.
- Find the designated path for the film leader, usually indicated by arrows or markings inside the camera. Carefully thread the film leader through the designated path, ensuring it passes over the sprocket holes, which advance the film with each shot.
- Check the film rewind knob on the camera. If it is in the raised position, gently lower it to ensure the film can advance correctly.
- Continue threading the film leader until it engages with the camera's take-up spool, which will wind the film as you capture each frame.
- With the film leader properly threaded, advance the film slightly using the camera's film advance lever, making sure the film is securely held by the take-up spool. The rewind knob should rotate as the film advances, indicating proper film placement.
- Before closing the back of the camera, ensure the film is taut and properly attached to the take-up spool. This will prevent film slack, which can lead to frame spacing issues and film binding.
Handling film with care to avoid damage
When handling your film, it's essential to exercise caution to avoid any damage that could impact the quality of your photographs. Consider the following tips for safe film handling:
- Hold the film canister by the edges to prevent fingerprints and smudges from affecting the film's surface.
- Keep film away from extreme temperatures, as heat can cause the film to degrade and lose its quality.
- Avoid touching the emulsion side of the film, as the oil and sweat from your fingers can leave marks or damage the film's surface.
- Ensure that the sides of the film align with the camera's film guides, preventing film slippage during shooting.
- Store unused film in a cool, dry place, preferably in a film storage container, to protect it from light, humidity, and other elements that may affect its quality.
Securing and Advancing the Film
Now that the film is properly loaded, it's time to secure it in place and prepare for photography. These next steps are crucial for ensuring smooth film advancement and consistent image capturing.
Importance of securing the film
Securing the film in the camera plays a vital role in achieving consistent and high-quality photographs throughout the roll. Here's why it's essential:
- The first frame of the film needs to be in the right position to ensure proper exposure and framing.
- Proper film engagement with the camera's take-up spool helps advance the film smoothly as you capture each frame.
- Securing the film leader in the designated slot prevents film binding, which can result in overlapping or skipped frames.
- Smooth film advancement is crucial for accurate frame spacing and avoiding film slack, which can lead to issues during photography.
- Ensuring the film rewind knob is securely lowered prevents accidental film rewind, which can spoil the roll.
Techniques in advancing the film
To advance the film smoothly, follow these techniques:
- Use the camera's film advance lever until it stops, indicating that the film is in the correct position for the next shot.
- Familiarise yourself with the direction of the arrow indicator on the film advance lever, as it guides the proper direction for advancing the film.
- Before pressing the shutter release, ensure that the film has advanced correctly, as indicated by the frame counter or film advance indicator.
- Engage the film advance lever fully, as incomplete engagement can result in film misalignment, leading to compromised image quality.

Ensuring Your Film is Properly In Place
Once you have advanced the film, it's important to verify that it is properly in place, ensuring that each frame is exposed as intended. Follow these steps to check the film placement:
Checking methods for proper film placement
Here are some methods to ensure proper film placement:
- Check the film rewind knob as you advance the film. It should rotate as the film progresses, indicating that the film is properly loaded.
- Verify that the shutter speed dial, film speed dial, and other camera settings are aligned with the film type and lighting conditions you have chosen, ensuring accurate exposure for each frame.
- Confirm that the film rewind crank rotates as you advance the film, suggesting normal film movement and proper placement.
- Take a test shot, review the first frame, and ensure that the film speed, aperture, and shutter speed settings are appropriate for the desired exposure. This can help identify any potential issues with film placement or camera settings before continuing with your photography.
Why is film placement important?
Film placement is crucial for several reasons:
- Proper film placement ensures accurate frame spacing, resulting in consistent composition and well-arranged images.
- Correct film placement prevents film binding, which can lead to film slippage, exposure issues, and damaged film.
- Ensuring the film edge aligns with the film guide promotes smooth film movement, minimising the risk of film tearing.
- Proper film placement allows the film rewind knob to rotate smoothly, indicating that the film is advancing as intended.
- Consistent film placement throughout the roll ensures accurate exposure, particularly for medium format cameras with the ability to capture multiple frames on one film.
How do you know when it's time to change the film in your camera?
It's time to change the film in your camera when you reach the end of a roll. Most film cameras have a film counter that shows how many exposures you have left. Once it reaches zero, it's a clear sign to change the film and load a new roll.
In conclusion, changing film in a camera is a crucial process that requires attention to detail and proper handling. Incorrect film loading can result in various issues such as light leaks, exposure problems, and even damage to the film itself. To ensure a smooth film change, it is important to choose the right film for your needs and gather all the necessary materials beforehand. Taking safety precautions before opening the back of your camera is essential to protect both the film and the camera. When loading the film, handle it with care to avoid any damage. Make sure to properly secure and advance the film to ensure smooth operation. Checking for proper film placement is also important to avoid any issues during shooting. By following these steps, you can confidently change the film in your camera and capture beautiful moments with ease. Happy shooting!